A while ago, I showed how to build a 1TB backup RAID in ten minutes. But what happens when a drive in this RAID goes bad? This is easy enough to deal with, but contains a few landmines along the way that can get you if you are not careful.
A few weeks back, I upgraded my backup RAID to use quiet, cool, 2TB disks. After working for a few days, one of the disks started throwing SMART alerts, which (in this case) signaled imminent failure. Soon enough, the drive became non-responsive. (This often happens with commodity components like drives or RAM: either they fail right away, or not at all.) As the drive was still under warranty, I got a replacement drive and swapped it into the RAID, and now all is well.
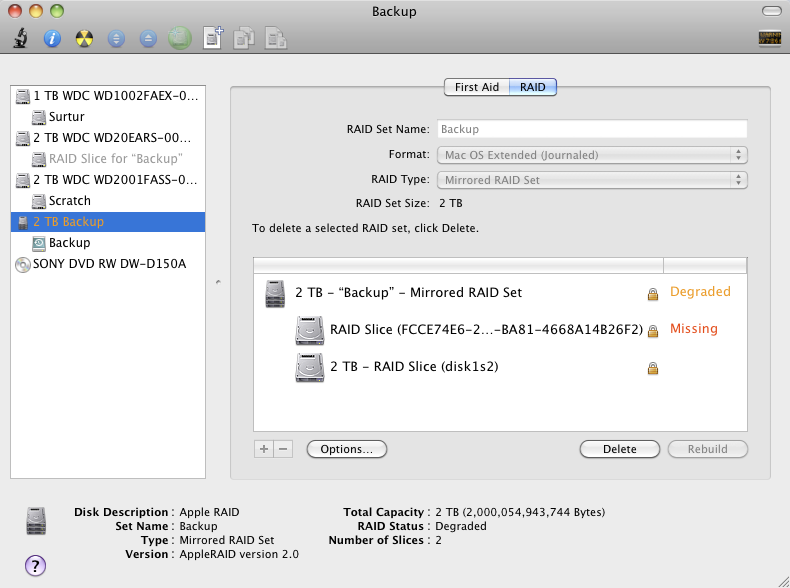
But, back up a bit. What do you actually see when this happens, and what do you need to do? Well, first of all, remember that the R in RAID stands for “redundant”. The whole point is that if one disk fails, the data remains safe on the remaining disk. At first glance, the RAID looks totally fine. If you run Disk Utility, though, it will tell you that the RAID is “degraded”, like so:

Note that if you have a problem, one of the disks might say “Damaged” or some other status instead of “Missing”, but the idea is the same. So, first land mine: you might be tempted to remove this damaged disk from the RAID set in Disk Utility. Do not do this. Instead, you want to get this disk out of the machine entirely, leaving the software part of the RAID alone for the moment.
Which brings us to the second land mine: how do you know which disk to remove? In the list of disks on the left of the Disk Utility screen, if you click on one of the disks, it should tell you what bay contains the drive at the bottom of the screen. If you still can’t tell, take a look at the RAID information for something like “disk1s2” on the damaged drive. Then run System Profiler. In the “Hardware: Serial-ATA” section, you should be able to find the matching “BSD Name” for the drive and figure out which bay the disk is in.
Once you know what bay to empty, turn off Time Machine, then shut down the machine and remove the drive (follow the link mentioned at the start of this post for how to do this). I should point out that, if you need to, once the disk is removed, you can restart the machine and use it for a while. The RAID will still be degraded, but will function with one disk if needed. (I ran in this state for a while while waiting for my replacement drive.)
Once the disk is removed, you have a couple of choices: you can try to repair the disk, or you can replace it. If you want to try repairing the disk, you should do so using a totally different machine. The reason for this is that once a disk has RAID information put on it, there is a chance that it will try to sync with other RAID disks as soon as it is put on a system with them, which could blow the information away.
One tool that helps immensely in messing with drives and moving them around is something like the NewerTech Voyager Q. This is a box that has several different kinds of disk interface on the back (USB, FireWire, eSATA) and a slot on top into which a SATA disk can be plugged, without messing with screws and mounting brackets and such. It’s totally worth the $70.
Anyway, however you do it, mount the drive on a different box and try to repair it. In my case, this didn’t work, and I had to replace the drive. If you must do so, it is crucial that you get a drive with the same capacity as the good drive in the RAID. Ideally, you want the same exact model of drive.
So, now that you have either a repaired or new disk, you hit the most important land mine: if you try to install this disk into your RAID, and it has some residual RAID information on it, it may hose your data. So, you need to reformat the drive before you add it in. Again, this is best done on a totally different machine. Being paranoid, I reformatted mine to FAT, then reformatted again to HFS, doing a single pass zeroing out of the data.
Now, install the drive into the main machine and startup. Once you are up and running, launch Disk Utility again. Get to the RAID section. As far as the software knows, the old drive it knew about is still missing, so you’ll see something much like the screenshot above.
If you click on the “Missing” part of the RAID in the UI, the buttons at the bottom should change to “Delete” and “Demote”. You should avoid the first one entirely, and only use “Demote”. This will pull the bad disk out of the RAID, but leave the original disk as part of the RAID.
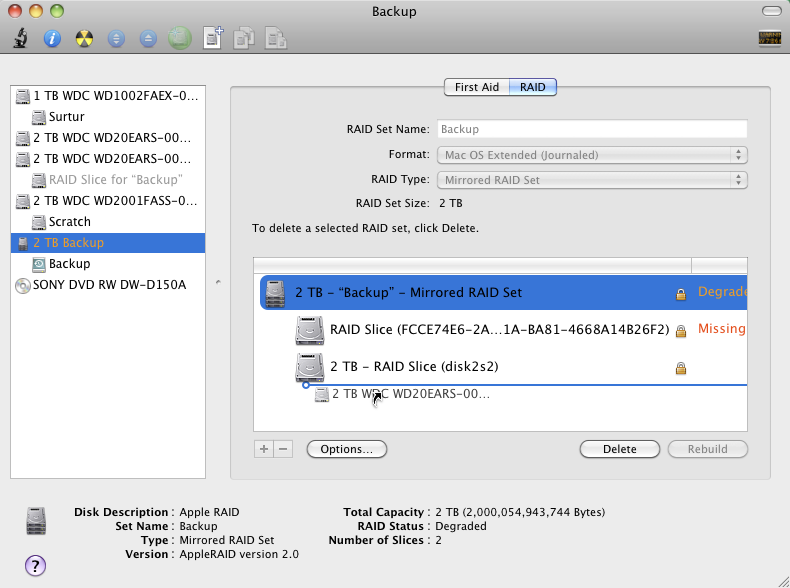
You can now also drag the new disk into the RAID list:

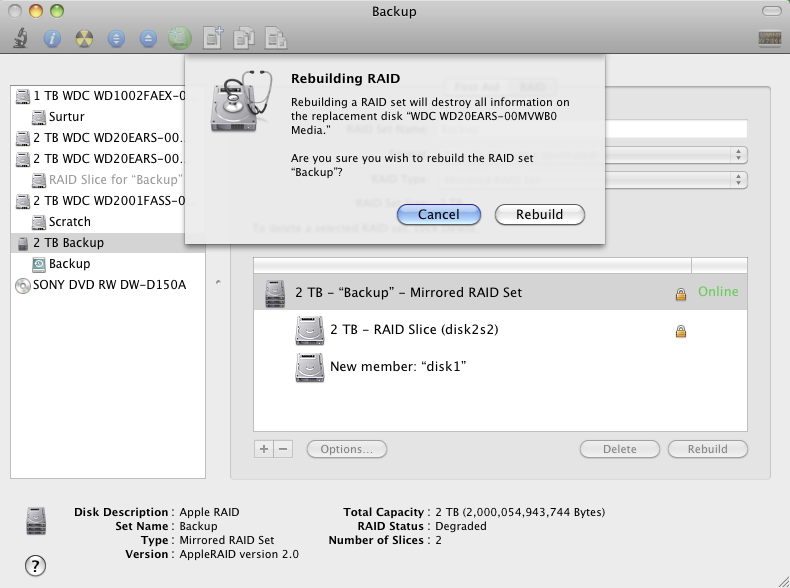
Once both of these are done, click the parent item in the RAID list. One of the buttons on the bottom will change to “Rebuild”. Hit this button. You will get a confirmation dialog:

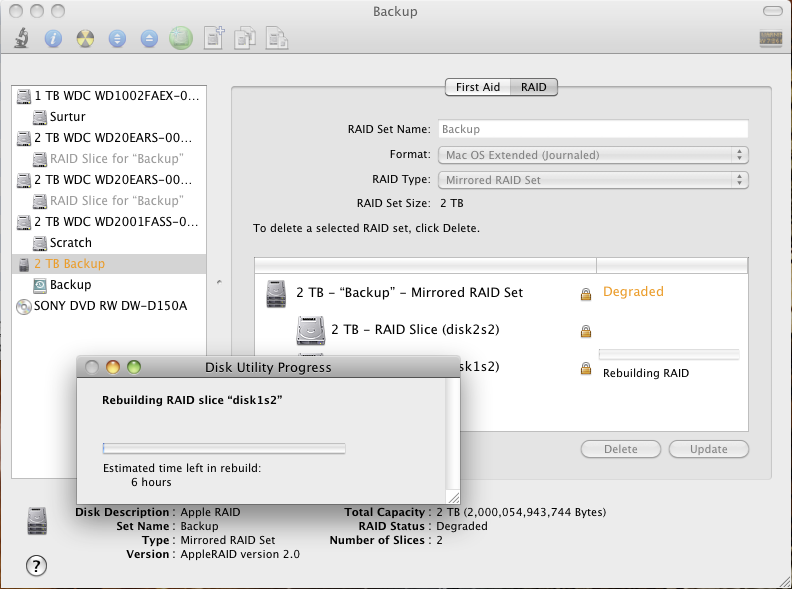
Click “Rebuild”, and then watch the progress:

Rebuilding takes hours, so read a book or something. Once it is done, the RAID should be just how you left it, but in full working order. Turn Time Machine back on and away you go.