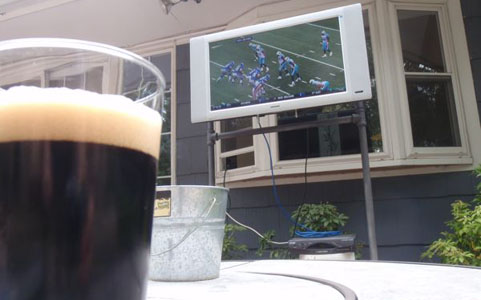
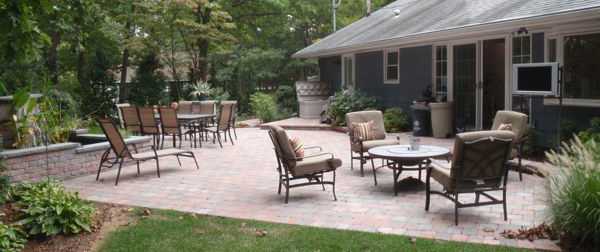
With football season starting, it’s important to get in some quality outdoor viewing before it gets to cold and nasty, particularly if you just spent way too much to redo your back yard. So…can you see the television stand in this back yard? Can your spouse?
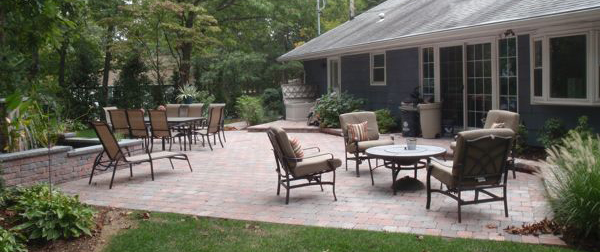
No, you can’t, because it isn’t there. You need a sturdy place to mount a TV outside, but one that doesn’t blight the landscape when the TV isn’t in use.
This post details my first attempt at producing such a stand. The idea is to build it out of sturdy piping that slides into anchor holes embedded into the ground. This gives the TV a sturdy base when you want it, but lets you pull the whole thing out and store it in a shed when you don’t, leaving almost no trace. I’m still experimenting with it, but this first attempt works pretty well so far.
Preparation
 Most of the materials for this stand can be
found at Lowe’s or Home Depot, and are not hugely expensive. Most of
these you will probably need to adapt to your particular needs, but here
is what I used:
- 1″ diameter, galvanized pipe
- 2 × 18″ ready cut pipe
- 1 × 36″ ready cut pipe
- 1 × 48″ ready cut pipe
- 2 × Standard tees
- 1¼″ inner diameter PVC pipe to make into to “J” pipes, something
like
- 2 × J-Bend
- 2 × 12″ pipe sections that will connect to the J-bend. Make sure the galvanized pipe above can slide into this piping.
- Cement, used at differnt points in the assembly. I used:
- 4 × 1/4″-20×2″ machine screws (or similar), with nuts and washers
- Spray paint
- Primer that works on metal
- Dark gray textured paint
- Small amount of black semi-gloss (optional)
- A post hole digger
- A Peerless® SF660 universal flat wall mount
- A mountable television. I used the Magnavox 32MF231 32″ LCD HDTV we normally keep in the bedroom
Even before gathering all of these together, though, you need to think your plan through. If you have a particular place you want the TV outside, before going through the trouble of building this stand, just set the TV up on a table close to where you want it and see how the picture works outside. In particular, does the glare from the sun obscure the picture? If so, you probably want a different spot.
Also, can you get power to where you want the TV? How about a signal (cable, satellite, etc.). Make sure you have all that figured out before you dive too deeply into this project.
Anchors
The PVC pipe should just barely slide around the galvanized piping that you’ll use to make the main frame. The idea is that this PVC will be buried so that the tops just stick out of the ground, anchored in cement. There are probably easier ways to do this, but here is what I did.
Take the J-bend and connect the 12″ PVC pipe to the longer end. Mix up one of the 10 pound buckets of cement. Sink the J-bend as far as it will go into the cement, so that it is totally submerged, but the straight pipe sticks up out of the cement. Look down into the pipe and you should see at least of bit of cement that has oozed into the bottom from the submerged end. This is fine, and should anchor the pipe even better. The idea of using the J-bend here is that it should let the cement grab onto the whole thing better than just a straight pipe would.
Set something to hold the open end of the pipe up as straight as possible while the cement dries. I cut a cross in the lid of the bucket, but boards or something should work fine.
Repeat the process with the other J-bend.
I suppose you could just pour cement directly into the ground instead of using the buckets, but I found the buckets were pretty useful in making the frame, as you could test the fit, move it around, and the buckets were heavy enough to hold the frame up for painting, even without being buried.
Frame
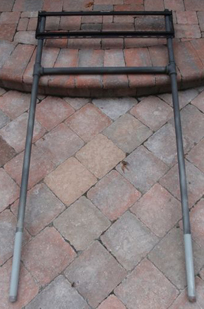
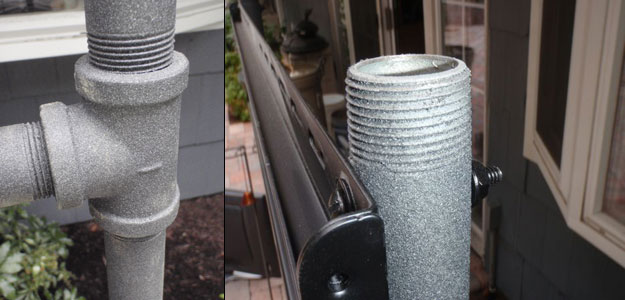
Looking at the picture above, you can see how the galvanized pipes form an “H”, with the 36″ pipe at the center. Since this is precut pipe, it should all screw together easily, and the long pipes make good levers to get it assembled tightly. It may still twist a bit, but don’t worry about that so much now. In case it isn’t obvious, the left side of the picture below shows a close up of the T connections.
Once assembled, test out the fit of the frame into the anchor buckets. The bottom legs of the “H” should just slide into the PVC pipe sticking out of the cement. Try to avoid jamming the frame all the way in, as it can be hard to get out if you do.
Remove the frame from the anchors and lay it out on the floor. Position the TV mount onto the top section to see how it will fit. One caution here: make sure to position the TV mount such that, when the TV is on it, no part of it collides with the cross bar of the frame’s “H”. I didn’t think about this, and it turned out that the TV’s built-in stand (which lets it stand on its own on a table) wound up at the exact same level as the crossbar, so I have to remove the stand to mount it outside, and put it back on when I bring in the TV. Sort of annoying.
To connect the TV mount to the frame, you’ll need to drill holes into the pipes. The TV mount should give you a lot of choice on running a bold through the mount, then through the pipes. The right side of the picture above shows an example. Drilling the holes is difficult. You’ll need a 3/8″ drill bit capable of penetrating dense metal. I would drill the top holes first, then position the mount again for marking the bottom holes. Once the holes are drilled, leave the mount disconnected.
If your pipes are like mine, they will probably be a bit greasy. Wash them with soap and water, WD40 or whatever to get them clean. After they dry, prime the frame. I put the frame into the anchors to do this, wrapping painters tape around the PVC to keep the primer off of it. Painting it like this allows you to get all sides at the same time. Once the primer is dry, add the textured paint. The picture above shows the texture I used. I also gave a light coat of glossy black to the bolts, nuts and washers that will connect the mount to the frame.
Once everything is dry, connect the mount to the frame with the machine screws. Now you’re ready to take it outside.
Planting
 Put the anchor buckets on the ground
approximately where they should go, and slide in the frame. Mark the
spots on the ground, then clear everything away and dig some post holes.
You want them just deep enough that an inch or so of the PVC pip will
stick out of the ground when you are done. As always, beware when you
dig in your yard. Is there a gas line or a power cable or something
running where you are about to dig? If you don’t know, find out first.
This is the part of the job where the wrong chain of events could kill you.
Maneuver the anchors (frame still inside) into the holes. You’ll probably need to fine tune here, adding and removing dirt to get the frame level, or to make the holes slightly wider and so on. The key bit here is to keep the frame slid into the anchors. Doing that should ensure that the frame will line up correctly with the holes and slide out cleanly. Once you are satisfied, the whole assembly should probably be standing on its own in the holes (this is another benefit of making the anchor buckets separately).
At this point, I decided to add some more cement into the holes. You could probably use rocks, or just really good dirt packing instead. After filling in the empty space around the buckets with dirt, I mixed a 20 pound bucket of cement and poured it equally into both holes. Again, I kept the frame inside the anchors the whole time.
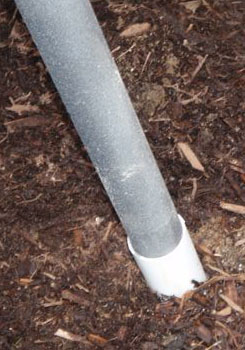
When it was dry, I filled the rest up with dirt and covered it in mulch. As planned about an inch of the PVC sticks out. I bought some capping to keep these covered when the frame is not in use. (If you look at the picture at the very start of this post, you can barely make out these caps in the ground.) Getting the frame out of the anchors the first time might be a bit difficult. Best way is with two people, standing on the anchor spots and pulling hard. You may want to try putting the frame in taking it out a few times, just in case.
Mounting
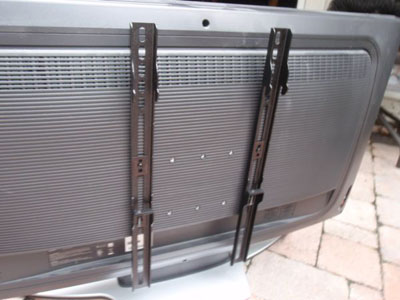
The Peerless mount works using two basic pieces. One is a sort of rail, which is what you connected to the frame. To connect the TV onto this rail, the mount will come with something that screws into the back of the television (usually two bars that run vertically). These can just be left on the TV, even if the TV you use isn’t usually wall mounted (mine isn’t). Connect them according to the instructions that came with the mount. If your TV gives you a choice of mounting positions, connect the pieces as widely apart as possible.
With everything in place outside, test the strength of the frame. Mine is pretty sturdy, barely budging. I’m only using a 36″ television, but I’m fairly certain the stand could handle a larger one, but I haven’t experimented with that yet.
Connect the TV onto the mount. Typically, the parts of the mount slide together loosely, then you tighten some screws up to hold everything solidly. Follow your mount’s instructions.
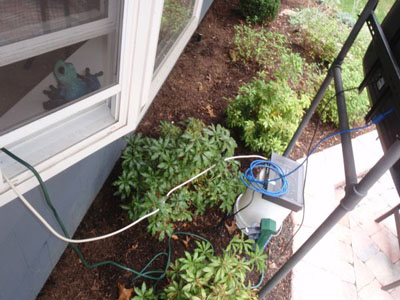
Now run the power and signal to the TV. In my case, I can feed both through a window behind the stand, so there are no cords for people to trip on.
When it is all set up, it looks like this:
Conclusions
Overall, I’m pretty pleased with how this stand turned out, with only three caveats. First, the mistake I made with the built-in stand hitting the crossbar makes setting up the TV and taking it down again more painful than I was planning. I might move the Peerless mount down slightly. This will leave some ugly holes, but I can live with that.
Second, I don’t have a great solution for holding the cable box yet. It would be nice to attach a shelf in some way to the frame to hold the box. I’ve thought about cutting slots for shelf brackets below the crossbar, and adding a shelf that way, but cutting the precisely into metal is hard. There is probably some type of shelf designed to clamp to piping, but I have yet to find one. If you have a great idea for this, leave a comment below (with links, if possible).
Lastly, the mount might be a bit too high. For something like a party, with people standing and milling around, it works pretty well. For sitting, it is just slightly tall. If the TV was bigger, this might not matter, as it would hang down slightly. I could easily take a hack saw to the legs of the frame, but I’m leaving it as is for now.
If you try building a stand like, let me know how it goes. And tell me what you changed. Cheers.
