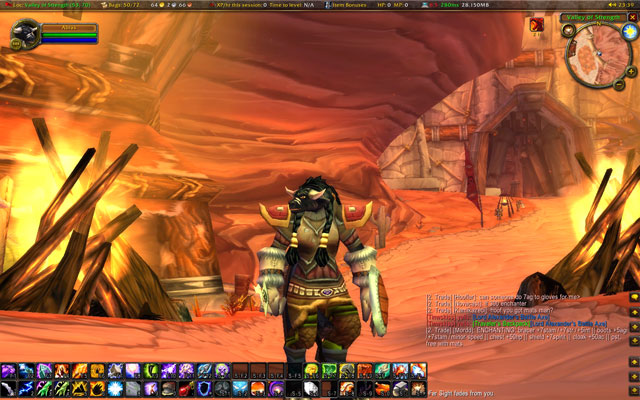
While watching the blessedly final appearance of some bad football announcers (“we could end up on the ocho”), I tinkered with some World of Warcraft addons. I had an idea of how I wanted things to look, but couldn’t realize it until finding FlexBar. Along with Titan, this incredibly arcane add-on (the FAQ indicates that the original author considered vi good user interface) allowed me to make my UI look like this:
If you want to do the same, the following might save you some pain. Once you install FlexBar, logon to WoW and go to the screen that allows you to edit your keybindings. Scroll down and you’ll see a bunch of FlexBar related bindings, all bound to nothing. Do the following:
- Bind some key (I used ctl-shift-f) to the “Open Flex Main Menu”.
- Bind FlexBar Button 1 through 12 to your primary action keys (e.g. 1, 2, …, 9, 0, -, =)
- Bind FlexBar Button 25 through 36 to some lesser-used action keys (e.g. shift-1, shift-2, …, shift–, shift-=). If you follow these instructions, these would be actions assigned to your right vertical bar.
- Bind FlexBar Button 49 through 60 to some lesser-used action keys (e.g. shift-F1, shift-F2, …, shift-F11, shift-F12). If you follow these instructions, these would be actions assigned to your right secondary bar.
- Bind FlexBar Button 61 through 72 to your secondary action keys (e.g. F1, F2, …, F11, F12). If you follow these instructions, these would be actions assigned to your left secondary bar.
Once done, return to the main screen and hit the key combo you assigned to the FlexBar main menu (item #1, above). In the ugly window that pops up, click “Script Editor”. This brings up another ugly window. Paste the following into it:
RunScript Script='MainMenuBar:Hide()' on='ProfileLoaded',
group button=1-12 anchor=1,
group button=25-36 anchor=25,
group button=61-72 anchor=61,
group button=49-60 anchor=49,
horizontalgroup group=1,
moveabs button=1 xx=2 yy=40,
horizontalgroup group=25,
moverel button=25 trgbtn=12 dx=38 dy=0,
horizontalgroup group=61,
moverel button=61 trgbtn=1 dx=0 dy=38,
horizontalgroup group=49,
moverel button=49 trgbtn=72 dx=38 dy=0,
show group=1,
show group=49,
show group=61,
show group=25,
lock group=1,
lock group=49,
lock group=61,
lock group=25,
text button=1-120 text='%b',
justifytext button=1-120 pos='bottomright'
This script assumes standard UI scaling. Under this scaling, buttons are 38 pixels. If your UI uses different scaling, you’ll need to change items in the script like “dx=38” to use whatever pixel size you use. Also, if you don’t want the labels on the buttons, remove the last two lines. Pasting this might strip out the returns, which you will need to add back in.
Once this script is pasted in, click the “config” button. This will run the items in this script (you’ll see them flash in green at the top center of the main screen. You might want to save the script as “DefaultConf” or something similar.
At this point, your new bars should be set up, but the default button bars (with the dragons on the side) is probably still visible. The script above will have added a line to take care of hiding it on startup, but you need to force one execution of it. You can do so by doing anything that changes the resolution of the screen (moving to windowed mode and back, for example) or logging off then back on.
You should also read the FlexBar docs if you use this beast, but that should get you going.
Update: I should have made clearer that if you hide your main bar as show here, non-toolbar functionality, like bags and xp display, are hidden. This is where the aforementioned Titan comes in, as it gives access to much of this functionality. Also, key combinations (e.g. ‘o’ for the social panel or ‘p’ for the spellbook) continue working as normal.
One thing that I do need to change is to move the “Channeling” bar up a bit. When I get this working, I’ll update the script above.
