After growing sick of New York radio, and to be able to hear Opie and Anthony again, I broke down and bought a Roady so I can listen to XM satellite radio in my car, a 1997 Saturn SL2. I elected to self-install the antenna and didn’t find much in the way of “how-to” information on the net. What follows is what I did. I’m not a professional, so follow at your own risk. Seriously. Messing around inside the center console of the Saturn has been known to do things like make the airbags spontaneously deploy. If this happens, depending on where your head is, it could conceivably kill you. I’m an not responsible for you hurting yourself. All I can say is that I did this with no problems.
You’ll need the following to follow these instructions:
- Size 15 Torx screwdriver or drill bit
- Black electrical tape
- Cutting tool (I used the scissors in my Swiss Army knife)
- Several hours
If you want to build a mounting block similar to the one that I did, you also may need:
- Miter saw
- Two or more medium screws (I used #6 x 5/8” pan head philips)
- Dark (preferably black) felt with an adhesive back
- A drill with a bit slightly larger than the diameter of the screws, but not larger than the heads of the screws
- The swivel mounting bracket that came with your Roady
- A couple more hours
The antenna affixes to the car with a strong magnet, so one question non-Saturn owners might not quite get is “will the magnetic antenna stick to my car?” Unlike most cars, the Saturn’s skin plays no role whatsoever in maintaining the structural integrity of the vehicle. It’s basically just for show, so it is made of plastic. Good for stopping dents, not so good at sticking to magnets. Rest assured, however, that the hood, roof and trunk of the Saturn are metal, and the antenna sticks to them just fine.
The Roady has the ability to broadcast a weak FM signal through the XM antenna to your car radio, so that you don’t have to use the tape adapter and can just tune to one of 10 preset stations. New York radio is extremely saturated, so I wanted to get the XM antenna pretty close to the car’s FM antenna. The trick to this is to find a way to get the cable inside the car. Had I been more brave, I would have ran the antenna cable through the same hole the existing radio antenna uses. Unfortunately, this appears to require the removal of the right front fender. This looked like it might be doable, but I decided against it. Instead, I chose to run the antenna cable backward down the length of the car:

Start by attaching the magnet to the roof (the circle on the image above), then tuck the cable into the groove between the roof and the trim. As you thread this cable, leave a little wiggle room for the cable. As the seasons change, your car (and cable) will expand slightly in the heat and contract a bit in the cold, so if you thread the cable super-tight, it could snap. Continue down the groove until you reach the trunk (which you should open).
Lay the cable down the edge of the tuck (very loosely for now) until you reach the taillight. The tail light is your secret weapon here, because the bulbs inside are fed power from inside the car, and you are going to thread your antenna through the hole for the power cable. First you need to remove the cover of the taillight:

Use a size 15 Torx driver (the head looks like a star) to undo the two screws holding the taillight on. Once these are out, the light should just pull off. It might come loose while you work, so keep a hand on it.

On the body of the taillight, you should see how the power cord feeds into a plug on the light. You can unplug this, which prevents the light from dangling by its cable and gets it out of your way (the trunk is a good place for it in the interim).
In the housing of the light, you’ll see a rubber tube/plug sort of deal. The power feeds the light, while the rubber provides a seal to prevent water from getting inside the trunk. Black electrical tape surrounds the plug tube, which needs to be removed:

At this point, turn your attention back to the antenna cable. You should be able to find a gap through which the cable can be fed into the taillight housing:

Once through, you’ll note that the connector on the antenna cable is a bit too large to fit through the rubber cable seal. You will need to cut it a bit. Very carefully cut one side of the cylindrical part of the seal lengthwise. Take care to avoid cutting the tape around the cable within or, of course, the cable itself. Stop cutting once the cylinder part is mostly open; do not cut the “disk” part:

You should now have enough room in the seal to feed the silver part of the antenna plug into the hole. Reach around inside the trunk and find the other side of the seal. Push the antenna plug with one hand and pull with the other. This takes a little tinkering, but the seal is fairly elastic, so some force should get it through and poking out of the seal into the inside of the trunk:

Pull the carpet in the trunk back and pull most of the slack of the antenna cable through. Leave a bit of slack outside the car for now, just in case. The antenna cable is much longer than you need, so all of the excess will be bunched up in that little dip in the side of the trunk.

Go around to the back seat and fold down the right side seat. Reach into the trunk and get the antenna plug. If you look down onto where the seat back meets the body of the car, you can see (or feel, at least) that the seat back is connected to a piece of metal that sticks out slightly from the side. There is enough room to run the antenna cable on the outside of this plate. The idea here is to get the cable past the seat back in such a way that folding the seat up and down won’t crimp, rub or otherwise harm the cable. Improvise if you need to.

Once through, pull quite a bit of slack through. Eventually, you’ll tuck some of this into the seat and side, but for now leave it loose. Pull the cable between the front seat and the inside wall of the car, as close to the floor as possible. You will run the cable under the front seat but, since the seat can slide back and forth, you need to run the cable where it won’t get caught on anything. Fortunately, you can easily run the cable under the runners on which the seat moves.
The only real trick to this is that there is a big spring under the seat that could catch the cable. Fortunately, there is a black plastic mesh around part of this spring:

Eventually, you will tape the cable to this mesh with black electrical tape, so that it always stays outside the spring; however, you need to see how much slack you will have left in the cable, so don’t do this yet. Instead, find the panel on the passenger side of the center console. It has an indentation marked “pull”. Pull it to remove the panel. This exposes the fuses, but more importantly gives you a place to run antenna cable.

You should be able to thread the cable so that it comes out of the center panel right where the cigarette lighter is. Since you’ll be powering the Roady with the lighter, you can twist the power and antenna cables together to feed the Roady.
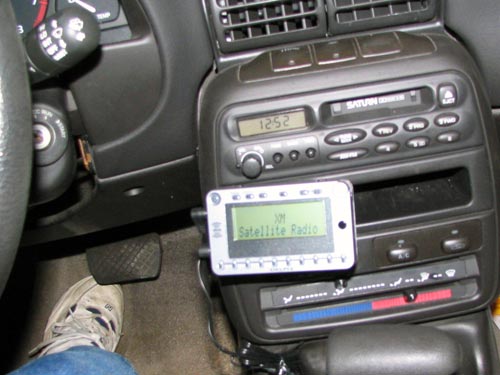
At this point, you’ll need to think about how and where you want to mount the Roady. I have the type of stereo that has a strange shelf-like thing under the tape deck, so crafted a mounting block that slides into this space (see below). If you want to do something different, you are on your own. Just make sure you leave enough antenna cable to reach the Roady.
Once you have figured out how much extra cable to leave hanging out of the console, run backwards along the antenna cable tucking the cable in. The idea is to eventually push all the slack back into the trunk, where the excess cable can be looped and stashed in the corner.
Replace the electrical panel. Under the front seat, tape the cable to the mesh around the spring. Tuck the cable underneath the plastic siding around the floor of the backseat, then up the back side of the seat and into the seam. Once in the trunk, loop up all the extra, tuck the loop away and replace the carpet.
Going back to the taillight, wrap black electrical tape around the cylinder of the seal that you cut open previously. You might want to use a few layers and make sure that all holes in the rubber are covered:

Reconnect the taillight plug, mount the light, and screw it back in. Your antenna is now ready.
If you want to mount your Roady like I did, make sure you have a Saturn with the hole/shelf thing below the stereo (if you don’t have this, you’ll need to find your own way). You will be constructing a block of wood that fits snugly into this shelf, then screwing the Roady’s mounting bracket into this wood. This holds the Roady securely, and in a good spot for tuning, all without making holes in your car. Assemble the materials mentioned at the top of this article:

On the wood block, measure off a piece slightly narrower than the Roady’s mounting bracket. You are going to use the back of the bracket as a “lip” that slaps right against the hole of the shelf, where the bracket is entirely outside the hole, with the wood block entirely inside. Don’t worry about about the height or depth of the block right now, just get the width right.
The hole/shelf has a taper to it, narrowing towards the engine, so you need to cut the block to match. Set your miter saw to about 3° and skim the top off the length of the block:

Your wedge may be a bit too thick to fit into the hole, so you might need to cut off some of the fatter end. Measure the height of the hole. On the tapered side of your block, find a point that is almost as wide as the hole. Mark that line, then cut the fatter end of the wedge off at that point.
Drill some pilot holes in the bottom of the Roady’s mounting bracket and screw the bracket into the fat end of the wood. Try to get the bottom of the bracket as level as possible with the block.
Your block may be too long at this point, but don’t measure yet. Instead, cover the block with adhesive felt. This gives the wood a bit of grip when put into the hole, prevents scratches and looks slightly better. Don’t worry about covering the back end for now.

Now fit the wedge into the hole. It will most likely stick out a bit. Start cutting bits off of the narrow end and refit into the hole. Repeat until the “lip” of the bracket fits snug against the edge of the hole. You can cover the back with felt if you want. It should look something like this (but less blurry, unless you’ve been hitting the margaritas while working):

Now mount the Roady on the bracket, plug in the power and antenna, and you are ready to go.